Programming

Post Processing Addition Continued

I’m back. It’s time for me to post some screenshots and stuff of my initial FXAA implementation.
And also share the downsides of this experience so far.

So without further ado, let’s take a look at the samples I prepared. I decided on a very dreaded example of aliasing… Vegetation!
(And just as a reminder: This is using the default preset for FXAA (‘preset 12’ to be precise) and everything is left as defaults so I have not tweaked it at all.)
(You can also click the images for larger size)
(Oh another thing: I think it’s a little confusing that the comparison shots don’t match, I apologize for that.)
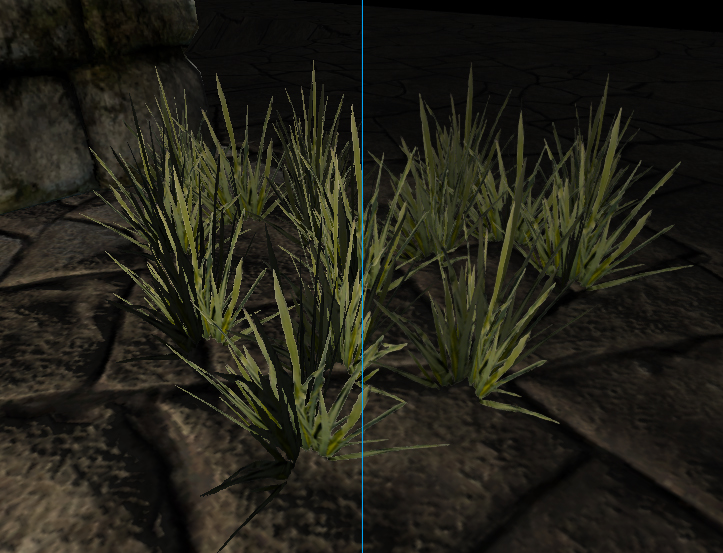
This is “zoomed in”. Really just the same image cropped and re-sized in Photoshop using nearest neighbor filtering so pixel hardness is intact.

And here’s the last one, a “long shot”. Image taken from further away to see the mipmap take effect.

Now then. Let’s move on to me just typing a bunch of nonsense.
First of all, I’m not particularly into anti aliasing as it is, and I don’t have a lot of experience with using it in any capacity.
It’s something that has fallen off my radar for the longest of time.
The part of my free time that I spend playing video games is in turn spent playing pretty dated games which often don’t have anti aliasing at all. So due to that it doesn’t often cross my mind when I play a game.

So anyway- I’ve read up on FXAA more thorougly now and I’m very much intrigued by it, partially because of its simplicity (took me less than half an hour to get it to work) and other very nice details such as its portability.
Mostly I’m intrigued by it because it’s performed in software, meaning it really doesn’t have to be rooted to the engine very deeply in order to work.
Like there are FXAA shaders for engines that don’t necessarily deploy it natively but are able to use it because they support custom post processing effects. Unreal Engine 3 comes to mind. (If I recall correctly there should be a FXAA shader for it somewhere…)

I briefly mentioned “downsides” on the second line of this post and that has to do with dips in the overall performance of my engine. That’s right; my engine finally suffered its first performance drop since its inception!
Given, it’s not a huge drop mind you, but just enough to get me concerned.
And I know what you’re thinking. It’s not just the FXAA. I actually think my HDR bloom is the real culprit, it’s pretty heavy on samples. I’m definitely going to need to trim that down a tad. Blurring is always expensive.

But all in all. I’m satisfied so far. I’m going to keep poking around with this now soooo… See you later! 🙂

Edit: OK… I forgot that I was in fact alpha testing manually in my fragment shader, which isn’t that fast. So the performance drop must’ve coincided when I started throwing those grass patch models around the scene. In fact: looking down at one of them drops my framerate significantly. So I think both my bloom and FXAA are off the hook for that one… Oops.

Post Processing Addition

That’s right. I’ve finally gotten off my butt and put a first implementation of FXAA into the pipeline. 🙂
So far it’s pretty much what I expected it to be. Anti aliasing. Pretty good such at that, since I don’t see any immediate problems with it or any outstanding visual artifacts.
I’m of course familiar with the potential caveats that come hand-in-hand with using an anti aliasing remedy such as FXAA.
But still, after all, I’m going for a “better than nothing” approach so this suffices well and plenty to what I imagine it to at this point.
And personally I think FXAA is one of the cooler things I’ve seen as of late. I don’t fully understand it right now so that adds a little to the mystery and coolness on my end. *laugh* (I’m excused since I’ve never really taken an in-depth look at the thing yet. 😉 )
But I, of course, intend to learn everything(read: as much as I can) about it if I’m ever hoping of using it in any capacity that’s beyond just putting it on the screen.
Beyond that I think it’s a very much suited for my renderer as it stands, being “hybrid” and all it can’t really use hardware anti aliasing so my options are pretty exhausted.

Anyway, I’ll get back to this, and I will pop back in a bit later with some screenshots and further information.
Bye. 🙂

Back on track

… like a derailed train …

No, but on a more serious note I’ve conquered the lot of them bugs that held me back.

Firstly, the reason why my post processing pipeline didn’t work as intended was because I forgot I had to reset my viewport’s size after I had scaled it down to render to a smaller render target than the viewport itself… Oops.

That means that I can now render my HDR bloom, emissive glow and all that good stuff into render targets that are half or even a quarter size of the window, which means they are cheaper to process.

Secondly, as I blabbered in the last post I was mostly talking out of my butt. Well- there were some things that are true, others are not.
As it turns out, the annoying light-bleeding bug I talked about was pretty easy to remedy. Granted it wasn’t the way I expected it to be solved, but thinking a little about it, it just might make sense after all.

So now. Onto new business.
Let’s take a look at this:

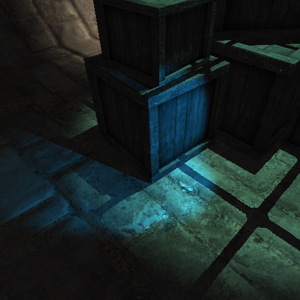
Christmas lights wrapped around a bunch of crates? No. Me being lazy, is all. I just slapped a crappy emissive texture onto the boxes to demonstrate.
What it does is that it makes glowing parts of a texture… well… Glow.

Now then, we can up the shenanigans a little more by:

BOOM. HDR bloom is enabled and everything just glows like it’s made out of emergency flares.

You should know that this is for demonstrative purposes only and in no way, shape or form constitutes what I really think these effects should look like. It’s just easier to see this way. I’m going to make both these effects very subtle later on, since we don’t want it to look like we’ve got something in our eyes.

Here’s an interesting side effect of producing such an overpowering HDR bloom:

Image is pathetically small, I know. But you can still see that the window actually becomes sort of a nice, glowy dot.

Alright. This is working somewhat like it should be. A nice addition still would be tone-mapping and some form of anti aliasing.
At that point I think I’d be satisfied with the basic setup my renderer deploys.

Back to work! 🙂

Edit: OK. This is something I keep coming back to, but turns out the “light-bleeding” problem was in fact just un-normalized tangent vectors that were giving me weird results. Nothing more than that.
To be more specific, the un-normalized vector was then used in a Dot product against the surface normal, so the result was right in some cases, but in cases where the surface varied in convex/concave shapes it started breaking down.
In some cases the tangent vector was almost pointing in the same direction as the normal vector…

My wit’s end…

Alright. I’m up to here with this bug and I’m falling back on my safety net for the time being.
I’m still not entirely sure as to where the bug itself is located, but experimentation shows that it might lie within the code that applies attenuation to the light (my first and most logical guess) or that it might lie within the code that defines the per-vertex TBN matrix.

At fiddling, both of these increase and decrease the bug itself, so the fair conclusion is that either one is the crook.

I’m not going to bother anymore right now because I could not be more tired of this than I am right now. I’ll need some time to cool off…

With my safety net plan in place it looks as if it already helps a bunch. There is a drawback, however, as with any half-measure.
The light’s attenuation is performed per-vertex instead of per-pixel like before. So, with very low tessellated meshes the lighting becomes extremely choppy, so the only way to remedy this is to enforce a more consistent tessellation across the objects that are lit by the light in question.
I’m not going to bother making this an automated process by attempting to use geometry shaders or something like that to further divide the model, even though that would be helpful.

We’ll see at a later date. I’m just sort of happy to finally get rid of that bug… Even though it came at a larger price than I was initially prepared to pay. It’s fine like this. 🙂

Laters.

Edit: OK… Turns out the same idea I used “above” can be used, but lighting doesn’t need to happen per-vertex. So right now the shader for the light is the same as before, save for one extra vector that’s passed from per-vertex to the fragment shader. I’ll have to test some more before I can speak with any certainty.

Things to keep me busy

So. Since I hit that little snag I posted about yesterday and I wasn’t able to post the updates like I imagined I just now thought that I’d put some stuff up here as an equalizer for the boring bugs I have to deal with.

Starting off with a model I made yesterday as a “warmup” for getting back into modeling a little more.
I’m determined to give a “modern” modeling workflow a shot, so I sculpted a model, remade its topology, baked normalmaps and ambient occlusion from it then finally made the textures using the information I had at that point.


So. It’s a stone column of sorts. I wanted to do a piece like this specifically because it’s sort of a “modules within modules” thing, and that appeals to me.
The column is composed of the individual bricks I sculpted, and the low-poly cage is built from that super high-polygon model.
It turned out surprisingly well, and the normalmap/ambient occlusion bake went effortlessly too. I usually have a lot of artifacts, but not this time.
Oh, I know the texture has seams. 😉 Laziness kicking in.


Here it is rendered real time also, just for kicks. Though it’s pretty hard to tell it apart from the background. Constant ambient, I curse you. Also, lack of scene “fog” that helps perspective.

So, there are some other things I wanted to explain/show, one which is actually in that engine render above.
The model is lit by two lights in that screenshot. One pointlight and one spotlight. The spotlight casts shadows onto the model that are made by a obstructing model which we’ll get to soon.
However, what’s changed from the last post I made showing spotlight shadows is that the shadows are now soft shadows.
Yes, that’s right. They are totally better looking now than before.
Right now the softness is brought on by a 4 tap PCF(percentage closer filtering) and a sort of screen space dithering routine. 4 tap PCF is usually a very low sample for soft shadows, but with the help of the screen space dithering the visual artifacts are not that noticeable.

The model that’s obstructing the light there is this one:


A window thing. That floats in mid-air.
There’s something else up with this window. It’s light-bloomed to the high heavens! That’s the HDR Bloom thing I’m working on for the post processing pipeline.
It’s not working that great right now, but gives a pretty good effect for making things glow.
The blurring I used for this effect is pretty costly. So there’s another reason not to use it yet.

Alright. There’s one last thing I mentioned in the last posts but didn’t show.
How I “improved” the water and what it looks like.


Here’s an “overview” shot of the water and where it intersects with the geometry.


Here’s a screenshot looking into the water near the column.


And here’s finally the change I made. At this low horizon angle the column is still visible where it intersects the water surface. This didn’t happen in the older water and I think it’s more “accurate” like this.

… And it’s OK. I know the refraction artifacts are pretty damn prominent. But I don’t really want to get into ameliorating it yet…

There- now that’s officially off my chest, I’ll get to go back to staring at pixels again. Bye. 🙂

Edit: One more for good measure:

The light, as reflected by the water surface. It of course changes shape depending on the viewer angle, it’s like any other specular highlight in the engine. 🙂

New stuff

Time for some more stuuuuff.
The renderer is getting closer to actually being usable right now, save for a few things that I will have to cram in there before I’m ready to start deploying it in my projects.
There’s a ton of optimization to do also, but I’ll hold off on that a tiny bit longer. I just have to get everything in at this point.

So moving on, here’s a tiny thing that is pretty much essential:

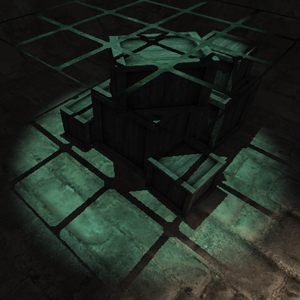
It’s a point light. The green stuff is the convex bounding volume, but the volume is optimized using the stencil buffer to remove all parts that don’t affect any geometry, making it much faster.
I’ll add also that this optimization routine isn’t enforced on small lights, due to the potential diminishing return in performance.

I have also added spot lights:

Here are two different kinds of spot lights, see any difference?
Well you probably do. One of them casts a nice shadows on the geometry below.
The other one is the deliberate “slim” version of a spot light which is rendered using the deferred rendering part of the pipeline, which is tons of times faster than the shadow caster spot light.
Similar to the point light the non-shadow caster spot light is also optimized using the stencil buffer.

There’s a reason to why I made two types of the same light. I realized pretty early on that shadows were going to be a pretty slim product in my engine, even though I’m still considering implementing more types of shadows, such as omni light shadows and cascaded shadow maps for outside environments. But right now I’m thinking mostly indoor environments.
The reason why there are two types of spotlight is that one can cast shadows, but can also have a so called “Gobo” that affects how the light looks.
This is something that I’m not willing to cram into my deferred rendering pipeline because that would be a significant bloat for situations that don’t use it. In these cases it’s better to treat the few occurrences of these effects with special measures and leave the really really basic stuff for the main pipeline.

Here’s another picture just for kicks:

You can see how sweet the blend is between the two lights that both cast their own shadow. 😉

After all that I’m pretty much done with the lighting part of the engine for now. I’m pretty happy with what you can do with it, albeit it being limited for some cases. Most of those cases being when we can use shadows and when we can not. I think it makes sense to save the shadow casting lights for dramatic lighting cues that can really make a difference. A lot of games do this nowadays also.


Lights aside, here’s something I talked about last time I posted:

Soft particles! 😀
What makes them so special is that they don’t intersect with the rest of the geometry in an ugly way like particles used to do in early 3d games. This technique gives them the look of actual volume, which is very nice indeed.
This effect is also very customizable and optional, because there are a few particle effects that really don’t need it.

What else?
* The shadows are really simple even though they look OK right now. (First time putting shadows in, gimme a break.)
* Particles still don’t play nicely with refractions or water.
* I fixed the water a little from the last post, I totally forgot that the “shore” shouldn’t be that opaque and should be modulated by depth too.
* The Gobo I mentioned isn’t implemented yet.

I’ve been doing a ton of stuff so there’s probably something I left out…
*Shrug* Oh well. Laters. 🙂

Additions

Yes, I’ve made a few.

When I sat down to implement the “hot air” effect, I ended up working more on the water instead.
This time I added depth fog and another thing which I’m not really sure what it’s called. Maybe it’s called a “product of common sense”.

I was tempted to put up another video, but I’ll have to hold off on that for a bit. You get to feast your eyes on these screenshots instead. I’ll explain what is happening also.

So first off:


“Depth fog”.
It simulates how water is actually not crystal clear and contains some level of grunge in form of tiny particles floating around, effectively making it more opaque the deeper it gets.
Another thing that I did, which doesn’t show in those screenshots, is that the distortion of the water isn’t applied where it intersects the environment, so it simulates how the light refraction is based on what amount of water exists between the light and the surface that is subjected to the warping effect.
So, in simpler terms: the distortion gets more noticeable the more submerged something is in the body of water.
Note also that the Fresnel term really helps in this case, the water gets “thicker” the deeper it is and the smaller the angle between the viewer and the horizon is.

All this was delivered by our trusty depth map. And this will also allow me to implement soft particles later on. Looking forward to that. 🙂

Next:

A huge portal of some kind.
Nah, but this is the aforementioned “hot air” effect. Though exaggerated in this screenshot, that’s what it does, it simulates the “heat shimmer” that is often seen above sources that emit heat to some capacity.
I will use it mostly for fire, because I find that flames look more chaotic when they leak over to things near them, you can sort of see that, yeah, that stuff is frickin’ toasty! 🙂

Problem is, this heat shimmer effect doesn’t play along with particles that great yet. So I have a bunch to fix there before I get to combine these two in the perfect harmony they should exist in.

To be continued. 😀

Renderer architecture

So yeah. I’ve been noticing a small dip in motivation towards writing my renderer. Part of why, is that I’ve started to notice the gaping holes that mar the potential beauty of it.

As I’ve mentioned before my renderer right now is a “hybrid” between a forward renderer and a deferred renderer.
I use both of these hand-in-hand to produce a single image, and I’ve been careful to design it in a way that there isn’t that much data that gets wasted frame to frame.
Where this system fails, however, is when you get a new idea of something you want to implement. My latest example of this was the water I posted about just before this post.

Now, I know I mentioned that I just basically hacked the water in there without much planning and such. And this is in no way false. But imagine my surprise when I examined it more thoroughly and it showed that there isn’t that much I could’ve done differently with the current setup.
I’m saddened by this, because it means I have to spend even more time planning out this renderer, just as I thought I was getting closer to a working setup.

All planning and no programming makes me a dull boy.

Another showcase and some other stuff…

(Also there’s that dagger again from the last video.)
So. After that bit of video I’m going to hammer my fingers against this keyboard for a little while, like so:

Just for a brief moment I’m going to tell you what you just saw in that video.
The most apparent thing, I guess, is the water. Both the water plane and the flowing water out of the gargoyle’s face.
The flow is just particles, as simple as that. Tiny billboards with textures, nothing fancy.

The water plane, however, is a little bit more complicated.
The main feature I decided to implement was the refraction, the rippling of whatever is seen through the surface.
So, because of this I left out reflections completely, and I decided to go with simple cubemap reflection for now.
I also have a simple Fresnel term for the water, meaning the refractions/reflections are only visible depending on the viewer angle. Although this doesn’t show too much in this video.

There are plenty of things left to be done. Like specular highlights from nearby lights on the water surface, or depth “fog” etc.
And after this little stunt my poor renderer is left bleeding. I picked it apart a lot and now it’s just kinda there, like some kind of mysterious monolith, staring back at me.

No, but on a serious note- the things in this video are seriously hacked together in a matter of hours, so there’s a good deal of negligence going on. That particle system, for example, is- I don’t dare to speak the words- hard coded.
And it’s just tacked on top of everything else like a gross ol’ band-aid.
Bottom line: It’s, technically, ugly as hell.
There are even some negligence visible in the video… Hint: Did you see that water-stream jump a little at times? That’s a frame-rate dependent bug. It did that when I was recording, but it doesn’t do that generally when I run it on my computer.

So why did I produce this monstrosity?
Hey, gotta start somewhere. Now that I know what I want, I can work on a better way of implementing it. 🙂

Bye now. 😀

Tiny Showcase

Here’s something I haven’t done earlier… A video! Yay!

Watch it and then proceed to tremble on the ground from the awesomeness. I’m just kidding… It’s not that great.
But it does show a model (which I also made), and my hybrid renderer in action.
Now since I wanted the cubemap reflection to show a lot, and it didn’t, this video is partially a failure.
But I’ll just go along with it for now.

I’m sure to post more videos if there’s anything interesting to show.